When you step through the gates of Rosenborg Castle, you aren't just entering a museum; you are stepping into a meticulously preserved time capsule of the Danish Renaissance. For photographers, both amateur and professional, the castle offers a visual feast of contrasts. The red brick masonry against the verdant copper spires, the interplay of shadow and light in the royal chambers, and the sheer opulence of the collections provide endless opportunities for breathtaking compositions. However, capturing the essence of Christian IV’s favorite residence requires more than just pointing and shooting; it demands an understanding of the unique lighting conditions and the history that permeates every corner.
Whether you are looking to update your portfolio or simply want the perfect shot for your travel feed, navigating the castle's layout is key. From the sprawling grounds of the King's Garden to the intimate, dimly lit corridors of the basement treasury, every angle tells a different story. Before you pack your camera bag, it is essential to know exactly where to look and how to prepare for the specific challenges of shooting inside a 400-year-old historic monument. This guide will take you through the most photogenic spots and the technical considerations you need to keep in mind.
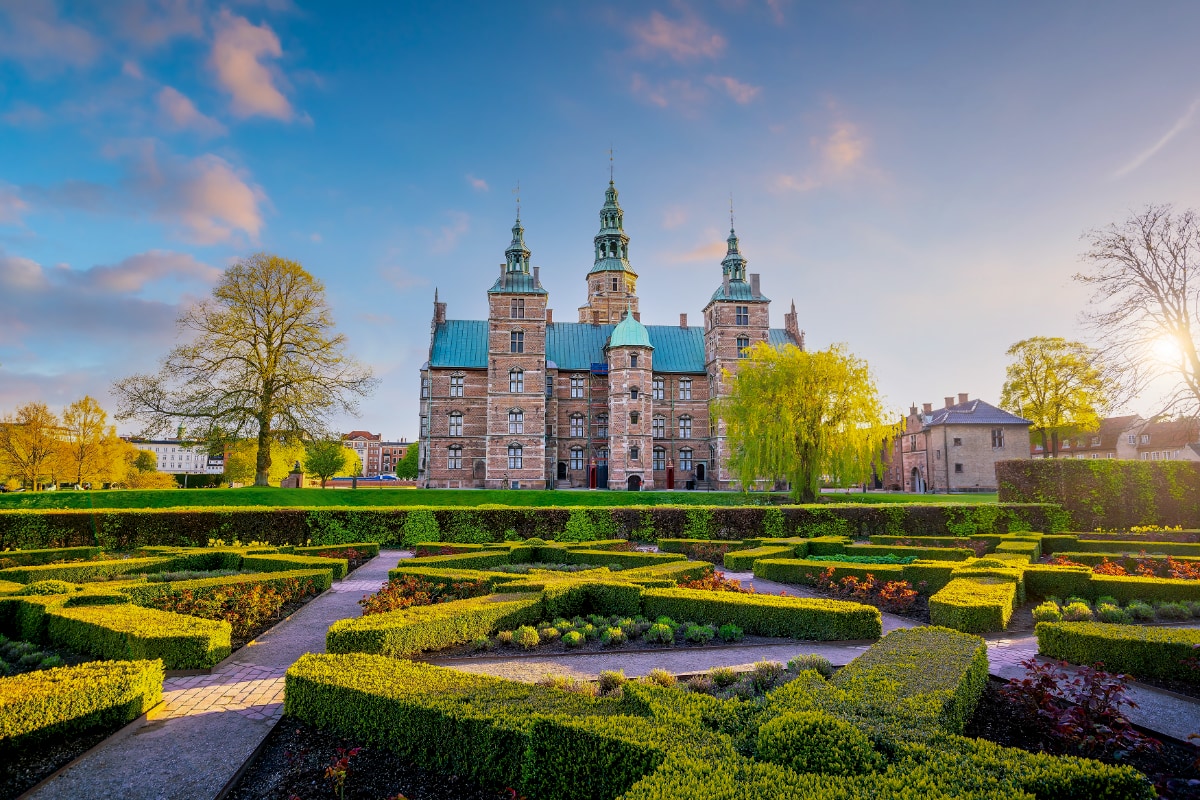
The King’s Garden: Exterior Angles and Composition
Before you even present your ticket, the photographic journey begins in the Kongens Have (The King’s Garden). This is Denmark's oldest royal garden and provides the most iconic framing of the castle. To capture the full grandeur of the Dutch Renaissance architecture, you should head to the The King's Garden avenues. The tree-lined paths create natural leading lines that draw the viewer's eye directly to the castle’s spires. In the summer, the rose gardens add a splash of vibrant color to the foreground, while the winter months offer a stark, moody atmosphere with bare branches framing the silhouette of the towers.
One of the most compelling exterior shots can be taken from the Hercules Pavilion at the end of the Kavalergangen. From here, you get a symmetrical view that emphasizes the castle's height and elegance. Don't forget to explore the moat area as well. On a calm day, the water acts as a perfect mirror, offering a reflection shot that doubles the visual impact of the building. However, be mindful of wind; even a slight breeze can disrupt the reflection. If you are visiting during the golden hour, the low Nordic sun hits the red bricks, making them glow with a warm, intense intensity that contrasts beautifully with the green copper roof.
Pro Tip: Experiment with different focal lengths. A wide-angle lens (e.g., 16-35mm) can capture the entire castle in its setting, while a telephoto lens (e.g., 70-200mm) can isolate architectural details like the spires and windows.
Mastering the Interiors: The Great Hall
Once you step inside, the lighting changes dramatically, but the photographic potential creates a new kind of excitement. The absolute highlight for interior photography is the Long Hall, also known as the Great Hall, located on the third floor. This room was designed to impress, and centuries later, it still does. The perspective here is majestic; the length of the room, combined with the rhythmic placement of the windows and the arched stucco ceiling, creates a sense of infinite depth.
For the best shot, position yourself at one end of the hall to capture the full symmetry. The three silver lions guarding the coronation chairs are the focal point here. They are life-sized and incredibly detailed. When photographing them, try to get low to the ground to emphasize their dominance and power. The light in the Great Hall is generally better than in the lower floors due to the large windows, but you will still need a steady hand. A common challenge is balancing the bright light from the windows with the darker interior. Try using spot metering on your camera to expose for the highlights and then adjust the shadows in post-processing. Be sure to capture the ceiling details as well; the elaborate stucco work and the coat of arms are essential elements of the room's visual narrative. You can learn more about the significance of these items on our Rooms & Highlights page.
Consider using a smartphone with a good dynamic range if you don't have a professional camera. Modern smartphones can often capture surprisingly good images in challenging lighting conditions.
The Treasury: Capturing the Sparkle
Descending into the basement, you enter the Treasury, home to the Danish Crown Jewels and Regalia. This is arguably the most challenging environment for a photographer due to the low light and the glass display cases. However, the reward is capturing some of the finest goldsmith work in the world. The key here is to manage reflections. Since you cannot use a flash, you must rely on the ambient spot lighting that illuminates the jewels.
To get a clear shot of Christian IV’s crown or the dazzling emerald set, place your lens as close to the glass as allowed without touching it. This technique helps to block out external reflections and glare from other light sources. Focus on the intricate details—the cut of the diamonds, the texture of the gold, and the deep colors of the velvet cushions. These macro-style shots often convey the luxury of the collection better than a wide shot of the entire case. A major hurdle here is the potential for your own reflection to appear in the glass. Wearing dark clothing can help minimize this. Also, try shooting at a slight angle to the glass rather than straight on. For a deeper understanding of what you are photographing, reviewing the Crown Jewels & Regalia section beforehand can help you identify the most historically significant pieces to focus on.
Another tip: Use the live view mode on your camera to zoom in and ensure perfect focus on the jewels. This is especially helpful in low light conditions.
Essential Photography Rules and Etiquette
Rosenborg is a fragile historic site, and there are strict rules in place to protect the artifacts and ensure a good experience for all visitors. It is crucial to be aware of these before you start shooting. Security personnel are vigilant, and violating these rules can cut your photography session short. To help you plan, here is a breakdown of what is and isn't allowed:
| Equipment / Action | Status | Reason & Tips |
| Flash Photography | Strictly Prohibited | Intense light damages textiles and pigments over time. Use a fast lens and high ISO instead. |
| Tripods & Monopods | Prohibited | They create tripping hazards and block flow in narrow rooms. Handheld shooting only. |
| Selfie Sticks | Prohibited | Risk of accidentally hitting artifacts or other visitors. |
| Large Camera Bags | Must be stored | Large bags are not allowed in the castle. Use the lockers provided. Check Accessibility for locker details. |
| Commercial Photography | Permit Required | Standard tickets cover private, non-commercial use only. |
If you have specific questions about gear or commercial rights, it is always best to consult the Frequently Asked Questions page prior to your arrival.
Lighting Tips and Best Times to Visit
Lighting is the make-or-break factor at Rosenborg. Since artificial lighting inside the castle is kept moody to preserve the atmosphere (and the artifacts), you are heavily dependent on natural light entering through the windows. The direction of the sun changes the feel of the rooms throughout the day. Here are some tips to maximize your success:
- Morning Light: The eastern side of the castle, including the King's Chamber, gets beautiful morning light. This is often the best time to visit to avoid crowds, allowing you to take wide shots of rooms without people in the frame.
- Afternoon Glow: As the sun moves west, the Great Hall gets bathed in a warmer light. This is ideal for capturing the texture of the tapestries and the depth of the stucco ceiling.
- Overcast Days: Don't be discouraged by gray Danish weather. Overcast skies act as a giant softbox, reducing harsh shadows and making it easier to expose for both the interior details and the view out the windows.
- ISO Settings: Be prepared to push your ISO. Modern cameras handle high ISO well, and a little grain is better than a blurry photo. An ISO of 1600 to 3200 is often necessary in the darker rooms like the Winter Room.
Planning Your Photographic Journey
To get the most out of your visit, planning is essential. The castle can get quite crowded, especially during peak tourist seasons. A crowded room makes it nearly impossible to get those clean, architectural shots of the interiors. We highly recommend booking your visit for the first time slot of the day. This gives you a head start before the larger groups arrive. You can easily Plan Your Visit by checking opening hours and peak times online.
Rosenborg Castle has limited capacity and time slots sell out fast. Secure your entry now to ensure you get the best lighting and fewer crowds.
BOOK YOUR TICKETS HERE
Remember that while the visuals are stunning, the context is what makes the photos truly meaningful. Take a moment to read about the History of the rooms you are photographing. Knowing that you are standing where kings planned wars and celebrated victories adds a layer of depth to your images that viewers will undoubtedly feel. Whether you are capturing the grand perspective of the Great Hall or the minute sparkle of a diamond in the Treasury, Rosenborg offers a canvas unlike any other.